
media server with Rasperry Pi and Docker
Ubuntu Docker media server
Foreword: This guide simply describes the media server stack I use on my Raspberry Pi server running on Ubuntu. You can refer directly to my Github repo where all my home server config is stored, including home automation and network tool stacks. A good way to try out is to clone this repo, edit the .env.example file and start docker-compose with docker-compose --file /path-to-docker-compose.yml --env-file /path-to-.env up -d.
Why Docker
I use Docker to run all the applications of my home servers inside containers. I actually used to just install the applications directly but I chose to migrate to Docker for a few reasons:
- Keep my system clean:
Everything from my services and apps are under my
home serverfolder and not spread all over. - Easy management: I can easily install, delete and update all my applications. I could also migrate really easily to another hardware, or a docker-swarm if needed.
- Learn about Docker: Containerisation and docker is really convenient to share and run code and apps on other people’s PC or the cloud, super useful skill to pick up.
In terms of performance, there is no difference between running this home server containerised or bare-metal and it saves a lot of time and headaches figuring out compatibilities issues.
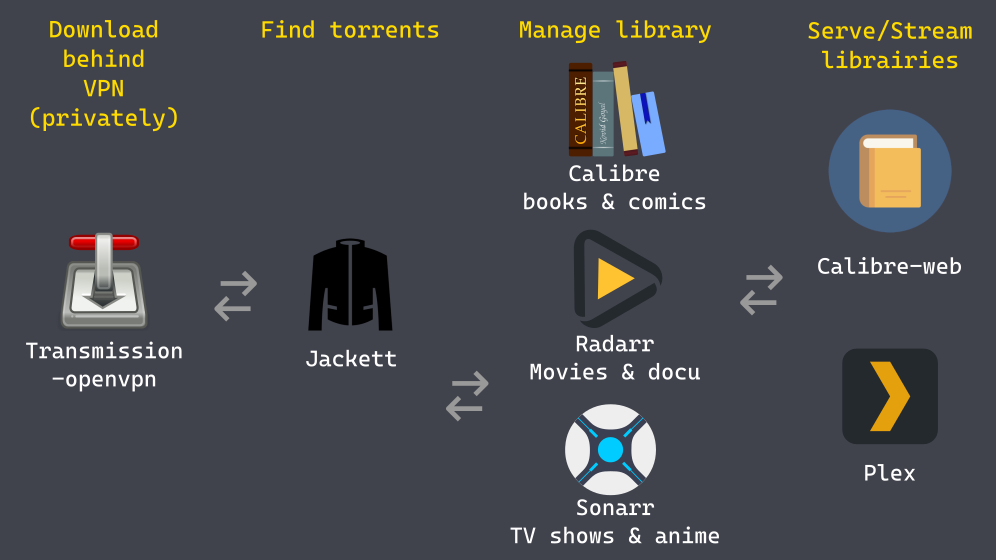
System diagram
Configuration
Prerequisite: linux server with a mounted drive for data storage, docker and docker-compose.
If you look at my Home server repo, you will notice:
- 3 stacks (home automation / media / tools), divided across 3 directories for clarity
- each container config files are stored in a consistent way, under the stack directory (./config/container-name)
- a single .env file with environment variables on the root directory to ensure consistency
The only drawback of this organization is we need to tell docker-compose where are the docker-compose.yml and .env files.
Luckily, it is quite easy with the following command.
docker-compose --file docker-compose.yml --env-file .env up -d
Notice: environment variables, are variables that are passed to a container at start time. For variables that need to be kept consistent through all containers (like directory mapping) or that you want to keep secret (like passwords), you may want to store them in a separate .env file. At start time, docker-compose will read the .env file and assign required environment variables.
Media stack
In this blog post, we will only look at the media stack. You can refer to the docker-compose.yml for the configuration. We will review briefly each container, but it is basically 6 images from linuxserver.io with simple configuration, and a more complex haugene/transmission image which I will explain below.
Plex
Plex is the heart of the media system, his role is to stream media to your PC, phone, TV, etc… It is a free application and some minor services are available at a reasonable premium.
  # plex media server
  plex:
    # https://hub.docker.com/r/linuxserver/plex
    image: lscr.io/linuxserver/plex
    container_name: plex
    network_mode: host # host mode => webUI is on port 32400
    volumes:
      - ./config/plex:/config
      - ${MEDIA}:/media
    environment:
      - PUID=${PUID}
      - PGID=${PGID}
      - TZ=${TZ}
      - version=docker
    restart: unless-stopped
The important parameters here are first the volumes mapping and environment variables. It is important to keep it consistent across all the different applications of this stack. /config is where all the persistent configuration data will be stored and /media is where our media libraries are. PUID and GUID are determining the user and group for the container, it is important to keep the same value across all containers so that we do not create permission conflicts.
# tree structure of /mnt
/mnt
└── data                       <- ${DATA}
    │
    ├── downloads              <- ${DOWNLOADS}
    ├── media                  <- ${MEDIA}
    │   ├── calibre-library
    │   ├── movies
    │   └── tv
Here is a image of the tree structure of /mnt/data drive where I store all my media. As some applications will need to hardlink, create and delete files across those folders, it is important to make sure that:
- PUID/GUID can read and write on this directory and subdirectories.
- all volumes are mapped as indicated in this page for each container.
Radaar
Radarr, will manage and download movie, with the help of jackett and transmission.
  # movie library
  radaar:
    # https://hub.docker.com/r/linuxserver/radarr
    image: lscr.io/linuxserver/radarr
    container_name: radarr
    hostname: radarr
    volumes:
      - ./config/radarr:/config
      - ${DATA}:/data
    environment:
      - PUID=${PUID}
      - PGID=${PGID}
      - TZ=${TZ}
    ports:
      - 7878:7878 # webUI at localhost:7878
    depends_on:
      - jackett
      - transmission
    restart: unless-stopped
Here we indicate that radarr should be started only after jackett and transmission as it uses them. We also map the default port for the UI of radarr.
Notice that we map /data and not only /media or /movies as Radarr needs to see the download directory as well.
Sonaar
Sonarr, does the same as Radarr but for TV shows and anime.
  # TV show library
  sonarr:
    # https://hub.docker.com/r/linuxserver/sonarr
    image: lscr.io/linuxserver/sonarr
    container_name: sonarr
    volumes:
      - ./config/sonarr:/config
      - ${DATA}:/data
    environment:
      - PUID=${PUID}
      - PGID=${PGID}
      - TZ=${TZ}
    ports:
      - 8989:8989 # webUI at localhost:8989
    depends_on:
      - jackett
      - transmission
    restart: unless-stopped
Basically the same configuration as Radarr.
Jackett
Jackett, translate queries from radarr and sonarr to torrent trackers to use in transmission.
  # torrent tracker search
  jackett:
    # https://hub.docker.com/r/linuxserver/jackett
    image: lscr.io/linuxserver/jackett
    container_name: jackett
    volumes:
      - ./config/jackett:/config
      - ${DOWNLOADS}:/downloads
    environment:
      - PUID=${PUID}
      - PGID=${PGID}
      - TZ=${TZ}
    ports:
      - 9117:9117 # webUI at localhost:9117
    restart: unless-stopped
Nothing new under the sun.
Calibre
Calibre is the reference for e-book and comics management.
  # ebooks library manager and server (include webserver)
  calibre:
    # https://hub.docker.com/r/linuxserver/calibre
    # for some reason, putting lscr.io before image
    # generates an error later...
    image: linuxserver/calibre:arm64v8-arch
    container_name: calibre
    volumes:
      - ./config/calibre:/config
      - ${DATA}:/data
    environment:
      - PUID=${PUID}
      - PGID=${PGID}
      - TZ=${TZ}
    ports:
      - 8080:8080/tcp # Calibre desktop gui.
      - 8081:8081/tcp # Calibre webserver gui.
    restart: unless-stopped
Once again, quite similar as before. Raspberry Pi needs an arm64 version for the containers, it is usually automatically fetched but I had to specify the architecture tag for this container.
Transmission-openvpn
Here is the tricky part of this stack. This container make sure that all your torrents are downloaded via a VPN. This is for privacy reasons, if you do not care about that, or do not want to subscribe to a paying VPN, you can use the much simpler linuxserver image for transmission. Personally, I use a VPN to access geography-locked content and services so I was already a subscriber.
I will not go much into detail here, but follow scrupulously the config values. Please have a look at the .env example file for reference.
  # torrent client
  # special image bundled with VPN
  transmission:
    # https://haugene.github.io/docker-transmission-openvpn/
    image: haugene/transmission-openvpn
    container_name: transmission
    volumes:
      - ./config/transmission:/config
      - ${DATA}:/data
    environment:
      - PUID=${PUID}
      - PGID=${PGID}
      - TZ=${TZ}
      # VPN and networking https://haugene.github.io/docker-transmission-openvpn/provider-specific/
      - CREATE_TUN_DEVICE=true
      - OPENVPN_PROVIDER=NORDVPN
      - NORDVPN_COUNTRY=${NORDVPN_COUNTRY}
      - NORDVPN_CATEGORY=${NORDVPN_CATEGORY}
      - NORDVPN_PROTOCOL=tcp
      - OPENVPN_USERNAME=${OPENVPN_USERNAME}
      - OPENVPN_PASSWORD=${OPENVPN_PASSWORD}
      - WEBPROXY_ENABLED=false
      - LOCAL_NETWORK=${LOCAL_NETWORK}
      - DISABLE_PORT_UPDATER=true
      # Transmission config
      - TRANSMISSION_HOME=/config
      - TRANSMISSION_DOWNLOAD_DIR=/data/downloads
      - TRANSMISSION_IDLE_SEEDING_LIMIT_ENABLED=true
      - TRANSMISSION_SEED_QUEUE_ENABLED=true
      - TRANSMISSION_INCOMPLETE_DIR_ENABLED=false
      - TRANSMISSION_DOWNLOAD_QUEUE_SIZE=30
      - TRANSMISSION_WEB_UI=combustion
    cap_add:
      - NET_ADMIN
    logging:
      driver: json-file
      options:
        max-size: 10m
    ports:
      - "9091:9091"
    restart: unless-stopped
Access
You can access all the WebUI from you local network from the ports listed in the docker-compose.yml and configure the apps from there. (eg. your-server-ip:9091 for transmission webUI) I may make another post for all the configuration tips and tricks for this stack and the best practices for managing libraries.
Another interesting feature is remote access to your media server from outside your LAN. You can use reverse proxy and expose some ports to the internet to directly access your media server, but I chose to use VPN as my router has built-int open-vpn server (I have an Asus rt-ac68u).
There are currently no comments on this article, be the first to add one below
Add a Comment